Field guide
Screenshot an entire webpage, not just the viewport
The dashboard was three screens tall. So you sent three screenshots.
Then the reply: "Which one is the top?" Then a second reply, from someone else: "The total isn't in any of these." It was. It was in the gap between screenshot two and three, where you scrolled a little too far.
⌘⇧4 captures what's on your display. A webpage is almost never on your display. It's a tall document you're looking at through a window the height of your monitor, and the screenshot gets the window.
There are built-in ways around that. They work, with conditions. Here they are honestly, before the one I built.
The built-in routes, browser by browser
None of these is a shortcut you can press anywhere. Each lives inside one browser, and each hands you something slightly different from an image on your clipboard.
Safari: Export as PDF. File menu, then Export as PDF. You get the whole page as a PDF, styled roughly like print. It's fast and it's complete. It's also a PDF, not an image: you can't paste it into Slack as a picture, and marking it up means opening Preview and working with PDF annotation tools. For an archive copy it's perfect. For "look at this," it's a detour.
Chrome, Edge, Brave, Arc: the DevTools command. Open developer tools with ⌘⌥I, press ⌘⇧P to open the command menu, type "full size," and choose Capture full size screenshot. Chrome renders the whole page to a PNG and downloads it. This is the trick every "full page screenshot mac" article leads with, and it works. It's also a five-step trip through a developer panel that most people outside engineering have never opened, every single time.
Firefox: right-click, Take Screenshot. Right-click the page, choose Take Screenshot, then Save full page. Firefox has had the friendliest version of this for years. If you live in Firefox, you may not need anything else.
Browser extensions. There are dozens, and the good ones work by scrolling the page for you and stitching the pieces together. Two things to know before you install one. First, an extension that captures pages needs permission to read the pages you visit, so read what it asks for. Second, stitching is where full-page captures go wrong, which is the next section.
Why full-page captures come out broken
Modern webpages don't exist all at once. They build themselves as you scroll.
Lazy loading. Images and charts below the first screen aren't loaded until you get near them. A capture that renders the page without scrolling it gets gray boxes where the charts should be. This is the number-one reason a "full page" screenshot of a dashboard comes back with empty panels at the bottom.
Sticky headers and floating bars. The navigation bar that follows you as you scroll shows up once per stitched segment. A page stitched from six screens has six navigation bars stacked down the image, each one covering the top of the content beneath it.
Scroll animations. Sections that fade in as you reach them are invisible to a capture that never scrolled. The page looks half-finished because, as far as the browser knows, it is.
Logged-in pages. The page you want is usually behind a login: the admin console, the billing dashboard, the vendor portal. Anything that renders the page outside your browser session captures the login screen instead.
The fix for all four is the same: render the page the way your eyes see it, top to bottom, after everything has loaded, inside a session that's signed in. That's a harder problem than stitching, and it's the one worth solving.
One step: capture the page from your front browser
Here's how it works in Snippy Snip.
Open the page in your browser. In Snippy Snip, choose Capture Web Pages (⌘U, or the Web Pages button on the start window). It reads the page straight from your front browser, whether that's Safari, Chrome, Arc, Brave, or Edge, and renders the entire page top to bottom with the lazy-loaded sections loaded, the way the browser's own full-size screenshot does, not stitched from pieces. The result opens in the editor as an image, ready to annotate, crop, and paste.
That's the single page. Two more things turned it from something I use monthly into something I use weekly.
Sessions. A small floating pill follows you while you browse. Click through a site page by page, press Capture on each, then press Done. The whole set opens together in one window, every page on its own carousel card, for annotating, naming, and saving as a batch. Documenting a twelve-page settings area becomes one click-through instead of twelve separate errands.
Logged-in pages. The pill has a sign-in browser. Log in there once and every capture in the session sees your account. You can click through your web app inside it and capture as you go.
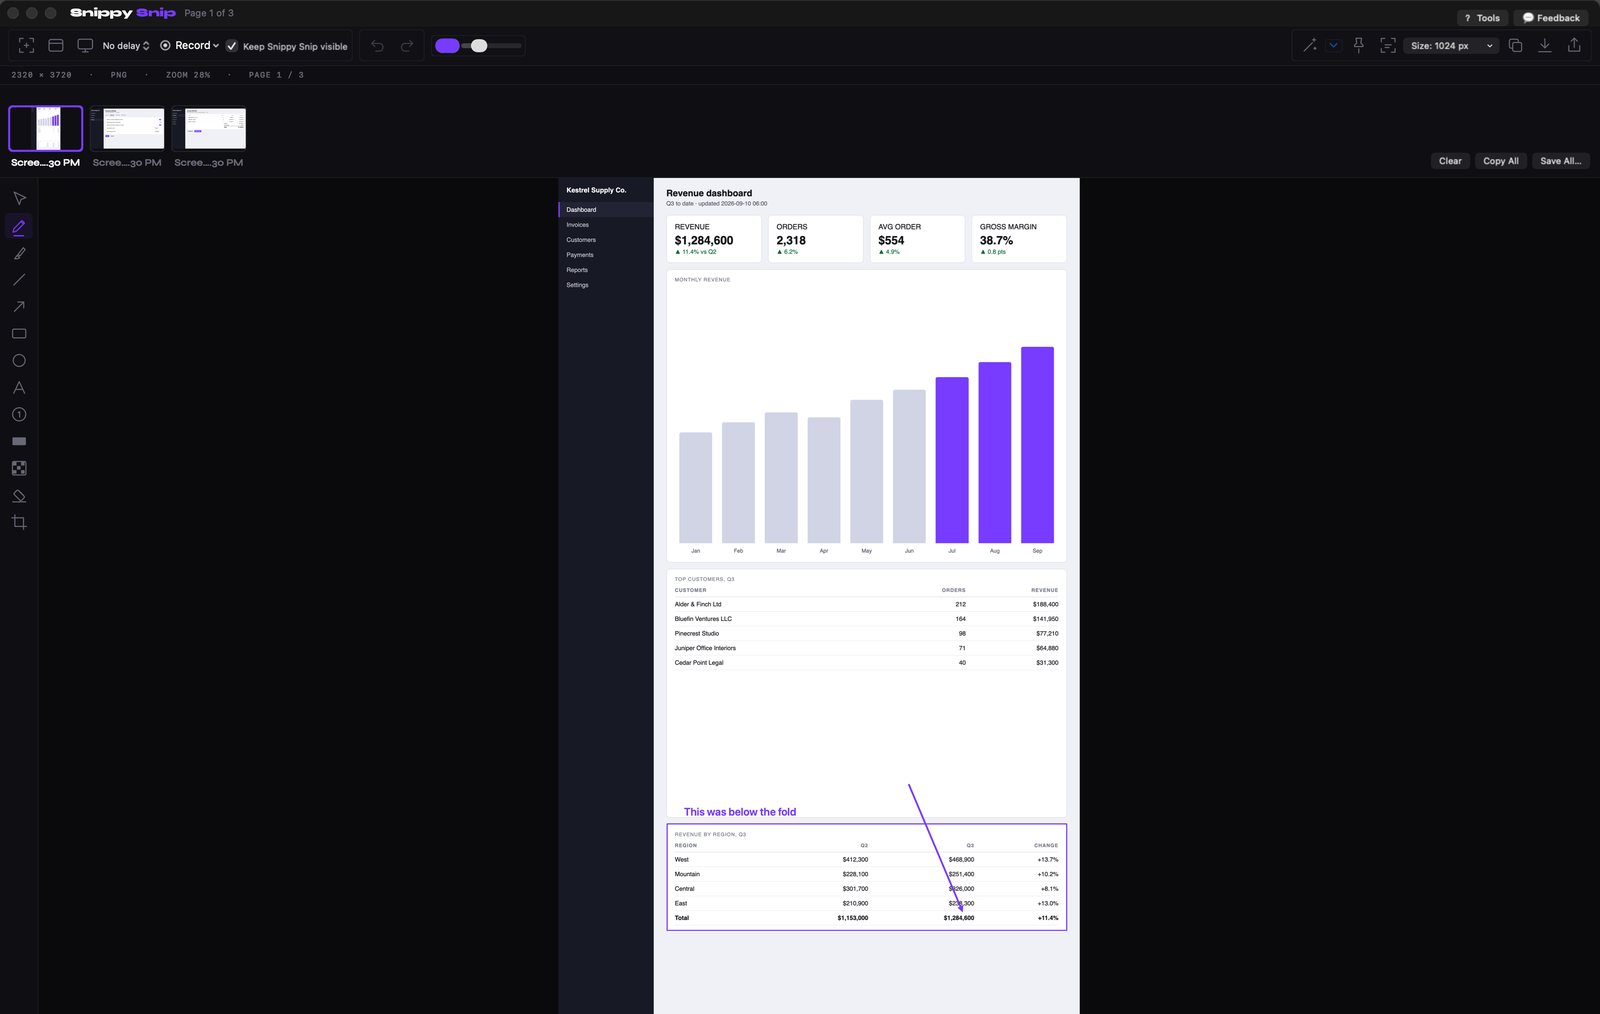
A three-screen dashboard captured top to bottom and opened in the editor at 28%, with the table that lived below the fold boxed. Every number invented.
What to do with a screenshot that's three screens tall
A full-page capture creates a new problem. It's enormous, and pasted into a chat it becomes a thumbnail nobody can read. Four habits fix that.
Annotate at the top. Whatever the reader needs first goes near the top edge of the image, because that's the part visible in a preview. If the point is in the bottom third, put a text callout at the top that says so.
Crop to the span that matters. Full-page capture is about not missing anything. Once you have it all, you're free to crop away the footer, the cookie banner, and the two screens of marketing above the pricing table. Capture everything. Share the part.
Name it before you save it. "pricing-vendorname-2026-09-10" beats "Screenshot at 4.12 PM" the day you need it again. The date matters more on web captures than on any other kind, because pages change and your capture is proof of what a page said when.
Keep the archive copy. For anything you might need to point back to, save the full image once and file it. The three-screenshot habit fails here twice over: the seams are exactly where the missing piece hides, and nobody can tell later which shot came first.
Where this shows up in real work
Month-end dashboards. The revenue dashboard as of the close, captured in full, filed with the close package. When someone asks in November what the dashboard said in August, you have it, not a memory of it.
Vendor terms and pricing pages. Keep a dated full-page capture of every pricing page you compare against. Pricing pages rot, and "it said $29 when I checked" is not evidence. The image with the date in its name is.
I've lived this one on this site. The Snagit alternatives article carries every competitor's price as read off the vendor's own checkout on 2026-08-20, and the date sits in the byline because those numbers started aging the moment they were published. I had pulled the same prices three weeks earlier, on 2026-07-29, and they held. That's luck, not a rule. On the same day, one vendor's homepage said "pay what you want" while its checkout said $12. Which is the price? The one on the page you can point to, with a date on it. That article tells readers to click through and confirm before trusting a number, and when one has moved, the answer to "what did it say before" should be an image, not a memory.
Long support threads. The whole ticket thread as one image, for the person who needs the context and doesn't have the login.
Settings pages for documentation. The admin page that scrolls for days, captured once, then numbered badges on the six fields that matter. That pairs with the how-to doc guide linked below.
So the next time a page doesn't fit on your screen, notice what you do. If the answer is "scroll and shoot three times," the seams are where the total went.
The tool I use
Snippy Snip is what I built after 22 years on Windows and no Snipping Tool on my Mac.
Free: region, window, and full-screen capture, the full annotation editor, blur and redact, and a session carousel with named captures and Save All. No watermark, no nag.
Pro, $19 once: full-page web capture from your front browser, with click-through sessions and sign-in for logged-in pages, plus screen recording with in-editor playback, Grab Text, and pinned shots. No subscription, every update included. If Firefox's built-in already covers you, keep your $19.
Free forever, no watermark. Pro is $19, once.
Twenty years in finance and operations, exited founder, still closing the books monthly across his own businesses. Built Snippy Snip after 22 years on Windows. LinkedIn