Field guide
The Snipping Tool for Mac: a field guide for Windows switchers
The first thing I did on my new Mac was open Spotlight and type "snipping tool."
Nothing came back.
After 22 years on Windows, that little app was muscle memory. Win+Shift+S, drag a box, and the image was on my clipboard, ready to paste into whatever I was writing. I used it more than any other program on the machine. On day one of the Mac, it was the only thing that felt like a downgrade.
Here's what took me embarrassingly long to work out: the Mac does almost all of it. It just doesn't give you an icon to click. The screenshot tools on macOS are keyboard shortcuts, and nobody hands a switcher the list.
So here's the list. Everything the built-ins do, honestly, before I say a word about what I built.
Your Mac already has a snipping tool. It's four keyboard shortcuts.
Learn these four and you've replaced most of what the Windows Snipping Tool did for you.
⌘⇧3 the entire screen
The blunt instrument. Everything you can see, captured instantly, no crosshair, no confirmation. If you're running two displays, you get one image per display rather than one wide image.
⌘⇧4 a region you drag
This is the one that replaces Win+Shift+S. The pointer becomes a crosshair with a live pixel readout. Drag a box, let go, done.
Two things make it usable, and neither is written anywhere on screen:
- Esc cancels. You are not committed once the crosshair appears.
- Hold the space bar mid-drag to move the whole selection without resizing it. This is the fix for starting your box two pixels off.
⌘⇧4 then Space: one clean window
Press ⌘⇧4, then tap the space bar. The crosshair turns into a camera icon. Hover over any window and it highlights. Click, and you get that window on its own, cropped perfectly, with its drop shadow.
This works on menus and dialog boxes too, which is the fastest way to document a menu path.
⌘⇧5 the capture toolbar
This is the closest thing macOS has to an actual app, and most switchers never find it.
A control bar appears along the bottom of the screen with six buttons: Capture Entire Screen, Capture Selected Window, Capture Selected Portion, Record Entire Screen, Record Selected Window, and Record Selected Portion. Next to them is an Options menu, which is where the real settings live:
- Save to. Desktop, Documents, Clipboard, Mail, Preview, or a folder you pick. This is how you stop the desktop clutter.
- Timer. None, or a few seconds' delay. Enough to open the menu you're trying to photograph.
- Show Floating Thumbnail. On by default. More on that in a second.
- Remember Last Selection. Underrated. If you're taking twelve shots of the same panel, this keeps the box the same size every time.
- Show Mouse Pointer and Show Mouse Clicks, plus a microphone option once you've picked a recording mode.
- Capture Format. Newer on macOS, and easy to miss: SDR (Most compatible) or HDR. If a screenshot ever looked washed out somewhere you pasted it, this is the setting.
Open this menu once, today, and change Save to. It is a two-minute fix for the single most annoying thing about Mac screenshots.
The one thing every switcher is missing: hold Control
Here's the gap that made the Mac feel broken to me, and it's worth the whole article.
On Windows, a snip goes to your clipboard. On a Mac, by default, it goes to your desktop as a file.
You drag your box, you hear the shutter, you switch to Slack, you hit paste, and nothing happens. Meanwhile a file called Screenshot 2026-08-20 at 10.14.32 AM.png has quietly appeared behind every window you have open.
The fix is one key. Hold Control along with any of the shortcuts above.
- ⌃⌘⇧3 copies the whole screen to the clipboard.
- ⌃⌘⇧4 copies a dragged region to the clipboard.
- ⌃⌘⇧4, then Space, copies a window to the clipboard.
No file gets written. Nothing lands on your desktop. Paste anywhere.
That's it. That's the whole Windows behavior you've been missing, and it costs you one extra finger.
The other half of the default flow is the floating thumbnail. After every capture, a small preview appears in the bottom-right corner and hangs there for a few seconds. It looks like a notification, so most people ignore it. Don't. You can drag it straight into a Slack message or a document without ever touching the file, or click it to mark it up.
Markup: what you get, and what you don't
Click that thumbnail and you land in Apple's Markup tools. They're better than switchers expect: freehand sketch and draw, shapes including rectangle, oval, line and arrow, a magnifier loupe, a highlighter, text boxes, line thickness, border and fill colors, rotate, and crop. Open the saved file in Preview and you get the same kind of toolbar with more room to work.
For "put an arrow on the thing and send it," that is genuinely enough.
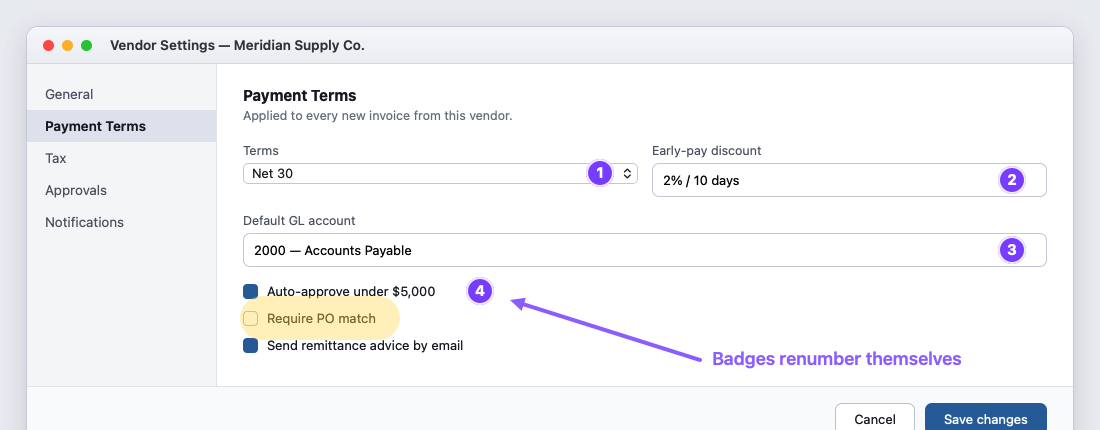
The thing Markup has no equivalent for: numbered badges that renumber themselves when you insert a step. Invented data, annotated with Snippy Snip.
Where it gets thin is repeat work. The markup panel is a moment, not a workspace. If you don't act on that thumbnail before it disappears, the file saves and you go hunting for it. There are no numbered step badges, so a five-step walkthrough means drawing five circles and typing five text boxes by hand, then moving them in pairs when the layout shifts. Nudging anything after the fact is fiddly, because the panel was designed for one quick mark, not for a document you'll revise.
Where the built-ins actually stop
I want to be fair here, because most of what you read on this topic pretends the Mac ships with nothing. It doesn't. But there are real walls, and if you hit them daily you'll feel every one.
1. No full-page web capture. The screenshot tools capture the viewport and only the viewport. The workarounds are exporting a page as a PDF from your browser, or opening developer tools. Both work. Neither is a screenshot.
2. No text extraction at capture time. macOS can pull text out of an image after the fact, and it's good: open the file in Preview or Quick Look and you can usually select and copy the text right off it. What you can't do is drag a box over an error dialog and have the words land on your clipboard as part of the capture. The capability exists. It isn't part of the flow.
3. Nothing pins. No built-in way to float a capture above your other windows while you work from it. If you're copying figures from one window into another, you're switching back and forth.
4. No history. One floating thumbnail, then a pile of PNGs named after timestamps. Finding the shot you took forty minutes ago means squinting at file previews.
5. Annotation is fine once and clumsy repeatedly. See above. Numbered steps are the tell.
6. Recording has no annotation. ⌘⇧5 records the screen, a window, or a selected region, and the quality is fine. But there's no drawing on it, no callouts, no highlighting the button you just clicked.
One shortcut, ⌃⌘⇧4, closes the biggest gap. The rest of these are the ones a tool has to close.
What I use, and where it came from
I went looking for a replacement, found that the good paid ones wanted a yearly bill forever for a screenshot tool, and built my own instead. It's called Snippy Snip.
The free version is where the everyday gaps get closed: region, window and full-screen capture, a real annotation editor (arrows, shapes, highlighter, text, numbered callouts, crop, redaction and blur), the capture on your clipboard the instant you take it and re-copied as you edit it, and a session carousel so your captures stack in the app instead of on your desktop. Free forever, no nags, no watermark.
Pro is $19 once, no subscription, every update included forever: screen recording with playback in the editor, full-page website capture, grabbing text out of any image, pinned shots that float above your work, and a delay timer.
And the honest note: if the shortcuts above cover your work, you're done. Most people's screenshot needs end at ⌃⌘⇧4, and paying anything for that would be a waste. The built-ins are better than their reputation. They're just invisible.
The five-minute setup
Whether you ever install anything or not, do these four things today:
- Learn ⌃⌘⇧4. Control-Command-Shift-4. Drag a region, paste it anywhere. This is Win+Shift+S, back.
- Learn ⌘⇧4 then Space. One clean window, no cropping.
- Open ⌘⇧5 once and change Save to, so screenshots stop breeding on your desktop.
- Take one shot and click the floating thumbnail before it vanishes, so you know what Markup can do.
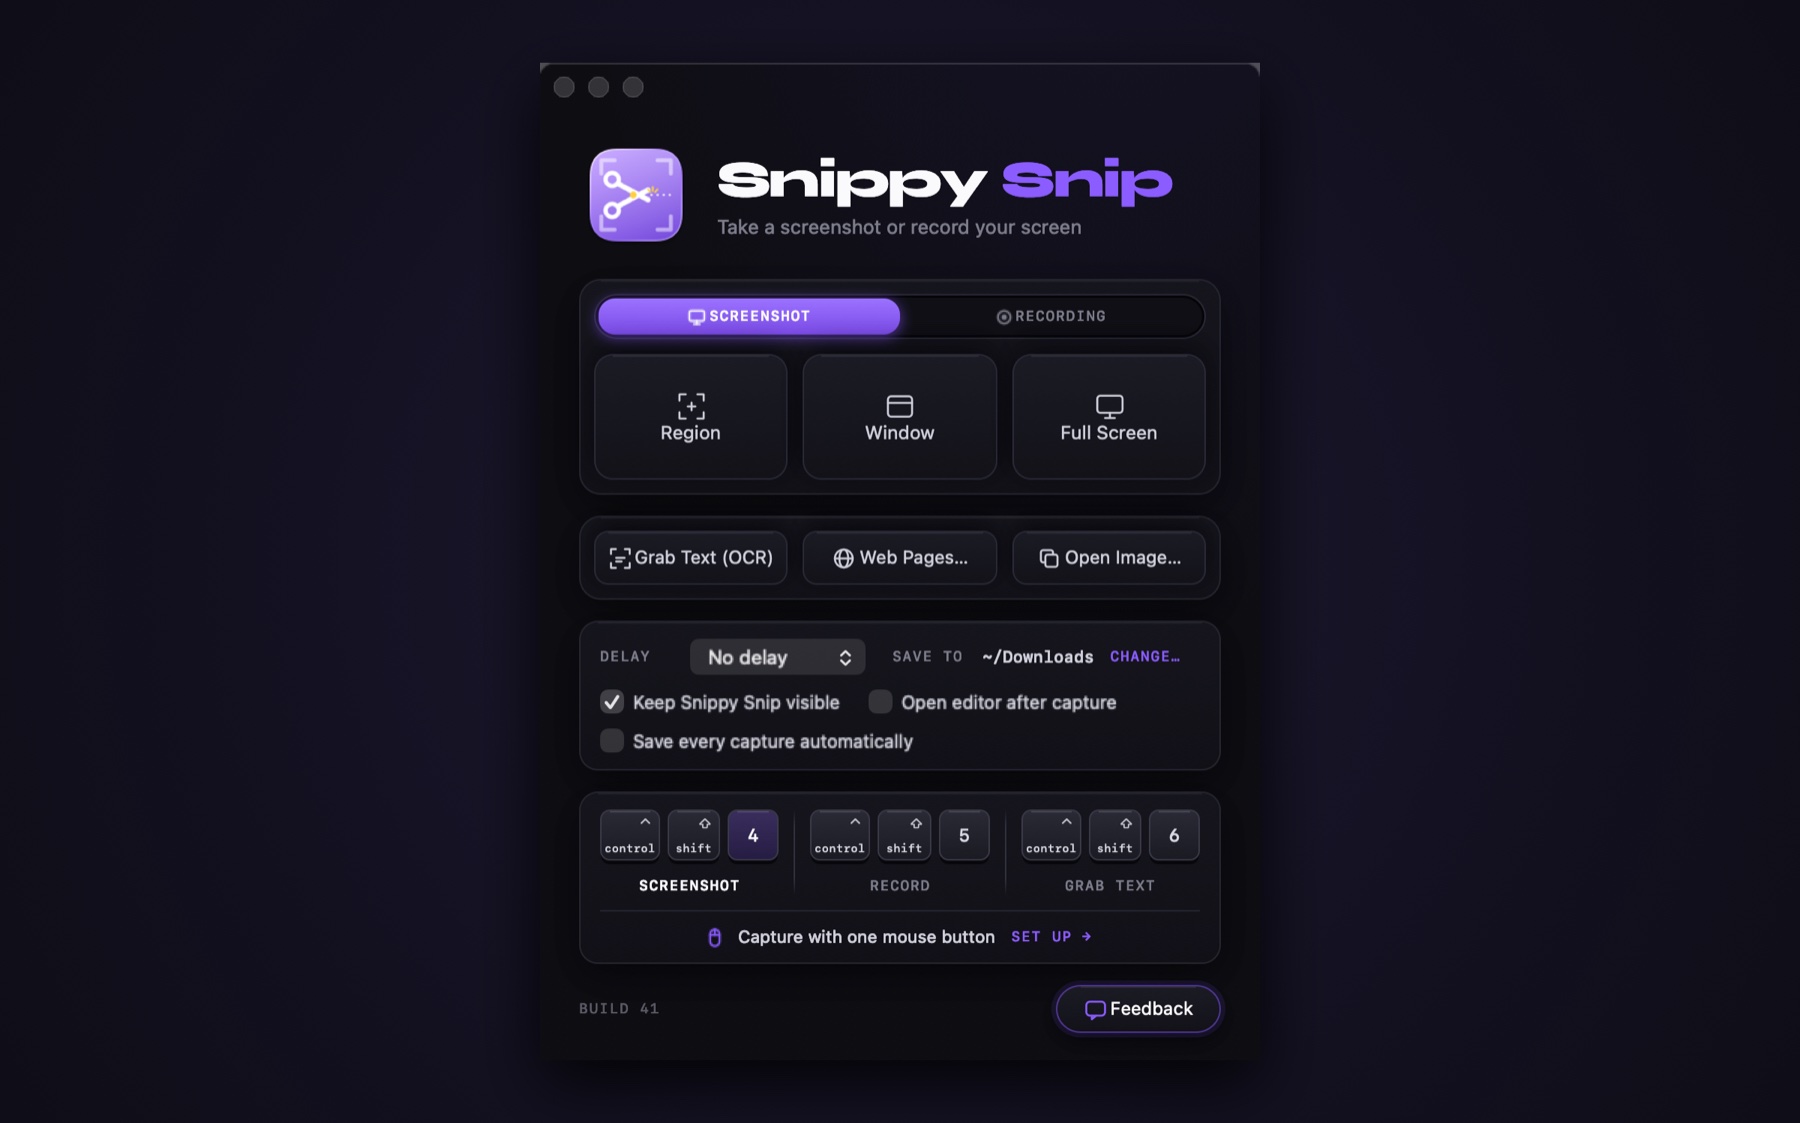
If you do install something: the start window shows every capture mode and the three shortcuts as keys, so the muscle memory has a picture to hang on.
You already made the hard switch. The last thing to move over is the muscle memory.
So what else are you doing the slow way on this machine, just because nobody told you the shortcut?
Free forever, no watermark. Pro is $19, once.
Twenty years in finance and operations, exited founder, still closing the books monthly across his own businesses. Built Snippy Snip after 22 years on Windows. LinkedIn